隐式动画 隐式动画是Core Animation框架自动完成的动画,不需要我们手动控制。支持隐式动画的CALayer属性叫Animatable Properties,苹果在这个 文档中列出了所有Animatable Properties。Tips :
UIView的默认layer的隐式动画是关闭的,自定义的CALayer隐式动画是开启的。
隐式动画默认duration是0.25秒
在animation block中UIView的隐式动画又重新开启,比如通过以下函数:
1 +animateWithDuration:animations:
禁用CALayer隐式动画方法:-actionForLayer:forKey:返回NSNull[CATransaction setDisableActions:YES];,比如
1 2 3 [CATransaction begin] [CATransaction setDisableActions:YES ]; [CATransaction commit];
显式动画 显式动画允许你对一些属性做指定的自定义动画,或创建非线性动画,比如沿着任意一条曲线移动colorLayer.backgroundColor动画
1
2
3
4
5
6
7
8
9
10
11
12
13
14
15
16
17
18
19
20
21
22
23
24
25
26
27
28
29
- (void )applyBasicAnimation:(CABasicAnimation *)animation toLayer:(CALayer *)layer { animation.fromValue = [layer.presentationLayer ?: layer valueForKeyPath:animation.keyPath]; [CATransaction begin]; [CATransaction setDisableActions:YES ]; [layer setValue:animation.toValue forKeyPath:animation.keyPath]; [CATransaction commit]; [layer addAnimation:animation forKey:nil ]; } - (IBAction )changeColor { CGFloat red = arc4random() / (CGFloat )INT_MAX; CGFloat green = arc4random() / (CGFloat )INT_MAX; CGFloat blue = arc4random() / (CGFloat )INT_MAX; UIColor *color = [UIColor colorWithRed:red green:green blue:blue alpha:1.0 ]; CABasicAnimation *animation = [CABasicAnimation animation]; animation.keyPath = @"backgroundColor" ; animation.toValue = (__bridge id )color.CGColor; [self applyBasicAnimation:animation toLayer:self .colorLayer]; }
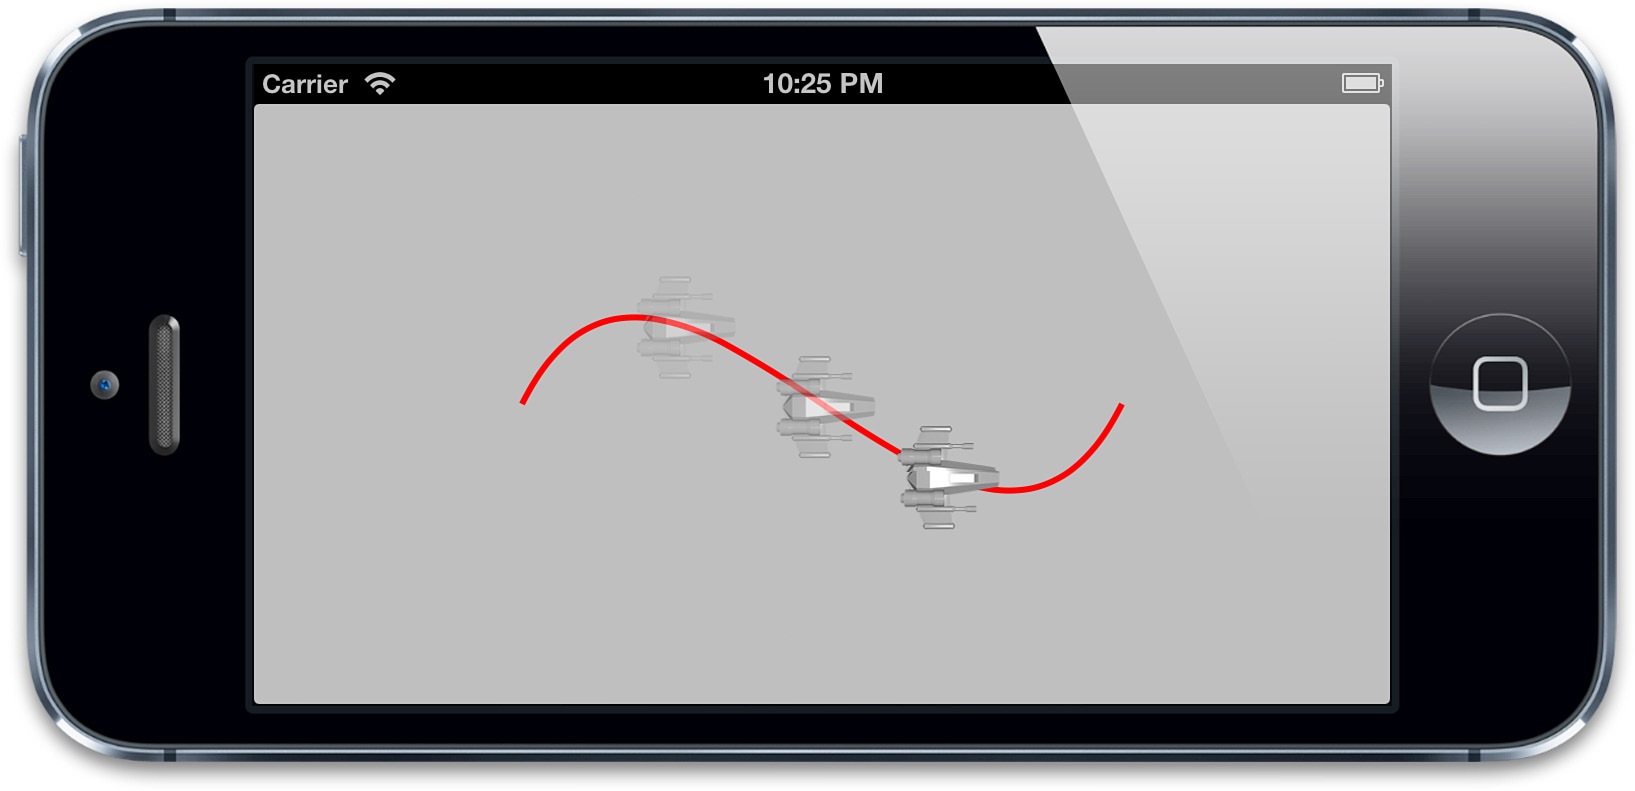
2.CAKeyframeAnimation
1
2
3
4
5
6
7
8
9
10
11
12
13
14
15
16
17
18
19
20
21
22
23
24
25
26
27
28
29
30
31
32
33
34
35
36
37
38
@interface ViewController ()@property (nonatomic , weak ) IBOutlet UIView *containerView;@end @implementation ViewController - (void )viewDidLoad { [super viewDidLoad]; UIBezierPath *bezierPath = [[UIBezierPath alloc] init]; [bezierPath moveToPoint:CGPointMake (0 , 150 )]; [bezierPath addCurveToPoint:CGPointMake (300 , 150 ) controlPoint1:CGPointMake (75 , 0 ) controlPoint2:CGPointMake (225 , 300 )]; CAShapeLayer *pathLayer = [CAShapeLayer layer]; pathLayer.path = bezierPath.CGPath; pathLayer.fillColor = [UIColor clearColor].CGColor; pathLayer.strokeColor = [UIColor redColor].CGColor; pathLayer.lineWidth = 3.0 f; [self .containerView.layer addSublayer:pathLayer]; CALayer *shipLayer = [CALayer layer]; shipLayer.frame = CGRectMake (0 , 0 , 64 , 64 ); shipLayer.position = CGPointMake (0 , 150 ); shipLayer.contents = (__bridge id )[UIImage imageNamed: @"Ship.png" ].CGImage; [self .containerView.layer addSublayer:shipLayer]; CAKeyframeAnimation *animation = [CAKeyframeAnimation animation]; animation.keyPath = @"position" ; animation.duration = 4.0 ; animation.path = bezierPath.CGPath; animation.rotationMode = kCAAnimationRotateAuto; [shipLayer addAnimation:animation forKey:nil ]; } @end
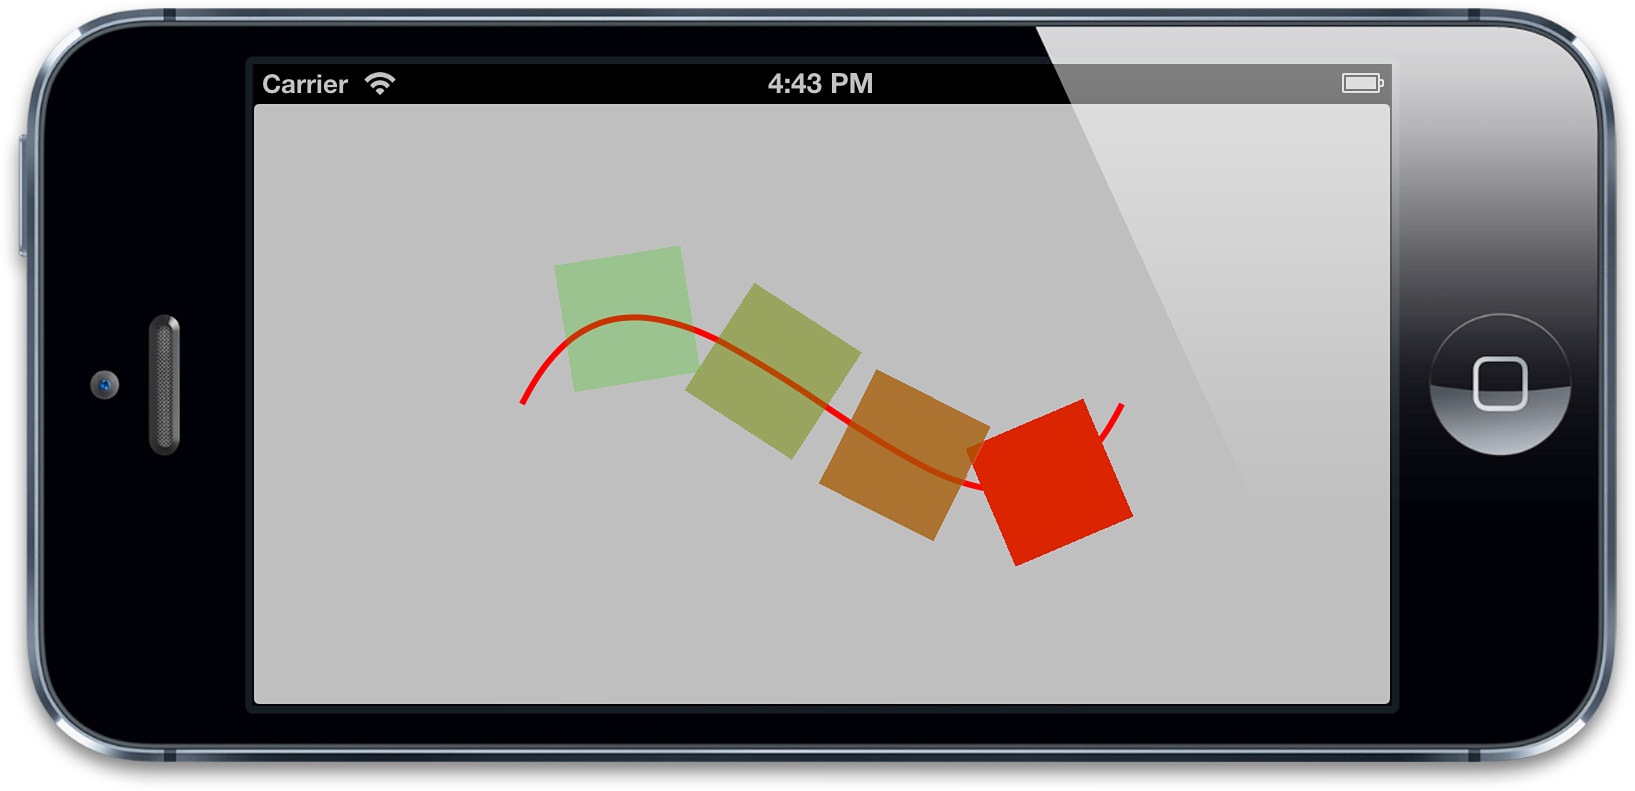
3.CAAnimationGroup
1
2
3
4
5
6
7
8
9
10
11
12
13
14
15
16
17
18
19
20
21
22
23
24
25
26
27
28
29
30
31
32
33
34
35
36
- (void )viewDidLoad { [super viewDidLoad]; UIBezierPath *bezierPath = [[UIBezierPath alloc] init]; [bezierPath moveToPoint:CGPointMake (0 , 150 )]; [bezierPath addCurveToPoint:CGPointMake (300 , 150 ) controlPoint1:CGPointMake (75 , 0 ) controlPoint2:CGPointMake (225 , 300 )]; CAShapeLayer *pathLayer = [CAShapeLayer layer]; pathLayer.path = bezierPath.CGPath; pathLayer.fillColor = [UIColor clearColor].CGColor; pathLayer.strokeColor = [UIColor redColor].CGColor; pathLayer.lineWidth = 3.0 f; [self .containerView.layer addSublayer:pathLayer]; CALayer *colorLayer = [CALayer layer]; colorLayer.frame = CGRectMake (0 , 0 , 64 , 64 ); colorLayer.position = CGPointMake (0 , 150 ); colorLayer.backgroundColor = [UIColor greenColor].CGColor; [self .containerView.layer addSublayer:colorLayer]; CAKeyframeAnimation *animation1 = [CAKeyframeAnimation animation]; animation1.keyPath = @"position" ; animation1.path = bezierPath.CGPath; animation1.rotationMode = kCAAnimationRotateAuto; CABasicAnimation *animation2 = [CABasicAnimation animation]; animation2.keyPath = @"backgroundColor" ; animation2.toValue = (__bridge id )[UIColor redColor].CGColor; CAAnimationGroup *groupAnimation = [CAAnimationGroup animation]; groupAnimation.animations = @[animation1, animation2]; groupAnimation.duration = 4.0 ; [colorLayer addAnimation:groupAnimation forKey:nil ]; }
4.过渡
1
2
3
4
5
6
7
8
9
10
11
12
13
14
15
16
17
18
19
20
21
22
23
24
25
26
27
28
29
30
31
32
33
34
@interface ViewController ()@property (nonatomic , weak ) IBOutlet UIImageView *imageView;@property (nonatomic , copy ) NSArray *images;@end @implementation ViewController - (void )viewDidLoad { [super viewDidLoad]; self .images = @[[UIImage imageNamed:@"Anchor.png" ], [UIImage imageNamed:@"Cone.png" ], [UIImage imageNamed:@"Igloo.png" ], [UIImage imageNamed:@"Spaceship.png" ]]; } - (IBAction )switchImage { CATransition *transition = [CATransition animation]; transition.type = kCATransitionFade; [self .imageView.layer addAnimation:transition forKey:nil ]; UIImage *currentImage = self .imageView.image; NSUInteger index = [self .images indexOfObject:currentImage]; index = (index + 1 ) % [self .images count]; self .imageView.image = self .images[index]; } @end
(2).UITabBarController切换动画
1
2
3
4
5
6
7
8
9
10
11
12
13
14
15
16
17
18
19
20
21
22
23
24
25
26
#import "AppDelegate.h" #import "FirstViewController.h" #import "SecondViewController.h" #import <QuartzCore/QuartzCore.h> @implementation AppDelegate - (BOOL )application:(UIApplication *)application didFinishLaunchingWithOptions:(NSDictionary *)launchOptions { self .window = [[UIWindow alloc] initWithFrame: [[UIScreen mainScreen] bounds]]; UIViewController *viewController1 = [[FirstViewController alloc] init]; UIViewController *viewController2 = [[SecondViewController alloc] init]; self .tabBarController = [[UITabBarController alloc] init]; self .tabBarController.viewControllers = @[viewController1, viewController2]; self .tabBarController.delegate = self ; self .window.rootViewController = self .tabBarController; [self .window makeKeyAndVisible]; return YES ; } - (void )tabBarController:(UITabBarController *)tabBarController didSelectViewController:(UIViewController *)viewController {  CATransition *transition = [CATransition animation]; transition.type = kCATransitionFade; [self .tabBarController.view.layer addAnimation:transition forKey:nil ]; } @end
5.使用UIView +transitionFromView:toView:duration:options:completion:和+transitionWithView:duration:options:animations:做过渡
1
2
3
4
5
6
7
8
9
10
11
12
13
14
15
16
17
18
19
20
21
22
23
24
25
26
27
@interface ViewController ()@property (nonatomic , weak ) IBOutlet UIImageView *imageView;@property (nonatomic , copy ) NSArray *images;@end @implementation ViewController - (void )viewDidLoad { [super viewDidLoad]; self .images = @[[UIImage imageNamed:@"Anchor.png" ], [UIImage imageNamed:@"Cone.png" ], [UIImage imageNamed:@"Igloo.png" ], [UIImage imageNamed:@"Spaceship.png" ]]; - (IBAction )switchImage { [UIView transitionWithView:self .imageView duration:1.0 options:UIViewAnimationOptionTransitionFlipFromLeft animations:^{ UIImage *currentImage = self .imageView.image; NSUInteger index = [self .images indexOfObject:currentImage]; index = (index + 1 ) % [self .images count]; self .imageView.image = self .images[index]; } completion:NULL ]; } @end
6.使用renderInContext:自定义过渡
1
2
3
4
5
6
7
8
9
10
11
12
13
14
15
16
17
18
19
20
21
22
23
24
25
26
27
28
29
@implementation ViewController - (IBAction )performTransition { UIGraphicsBeginImageContextWithOptions (self .view.bounds.size, YES , 0.0 ); [self .view.layer renderInContext:UIGraphicsGetCurrentContext ()]; UIImage *coverImage = UIGraphicsGetImageFromCurrentImageContext (); UIView *coverView = [[UIImageView alloc] initWithImage:coverImage]; coverView.frame = self .view.bounds; [self .view addSubview:coverView]; CGFloat red = arc4random() / (CGFloat )INT_MAX; CGFloat green = arc4random() / (CGFloat )INT_MAX; CGFloat blue = arc4random() / (CGFloat )INT_MAX; self .view.backgroundColor = [UIColor colorWithRed:red green:green blue:blue alpha:1.0 ]; [UIView animateWithDuration:1.0 animations:^{ CGAffineTransform transform = CGAffineTransformMakeScale (0.01 , 0.01 ); transform = CGAffineTransformRotate (transform, M_PI_2); coverView.transform = transform; coverView.alpha = 0.0 ; } completion:^(BOOL finished) { [coverView removeFromSuperview]; }]; } @end
7.移除正在运行动画
1 - (void )removeAnimationForKey:(NSString *)key;
or
1 - (void )removeAllAnimations;
example:有start和stop两个按钮,start开始动画,stop停止动画
1
2
3
4
5
6
7
8
9
10
11
12
13
14
15
16
17
18
19
20
21
22
23
24
25
26
27
28
29
30
31
32
33
34
35
36
37
38
39
40
41
42
43
@interface ViewController ()@property (nonatomic , weak ) IBOutlet UIView *containerView;@property (nonatomic , strong ) CALayer *shipLayer;@end @implementation ViewController - (void )viewDidLoad { [super viewDidLoad]; self .shipLayer = [CALayer layer]; self .shipLayer.frame = CGRectMake (0 , 0 , 128 , 128 ); self .shipLayer.position = CGPointMake (150 , 150 ); self .shipLayer.contents = (__bridge id )[UIImage imageNamed: @"Ship.png" ].CGImage; [self .containerView.layer addSublayer:self .shipLayer]; } - (IBAction )start { CABasicAnimation *animation = [CABasicAnimation animation]; animation.keyPath = @"transform.rotation" ; animation.duration = 2.0 ; animation.byValue = @(M_PI * 2 ); animation.delegate = self ; [self .shipLayer addAnimation:animation forKey:@"rotateAnimation" ]; } - (IBAction )stop { [self .shipLayer removeAnimationForKey:@"rotateAnimation" ]; } - (void )animationDidStop:(CAAnimation *)anim finished:(BOOL )flag { NSLog (@"The animation stopped (finished: %@)" , flag? @"YES" : @"NO" ); } @end
总结
隐式动画:Core Animation支持CALayer一些可动画属性(Animatable Properties)自动执行动画,我们只需要改变属性值,系统自动完成动画。UIView.layer获得的layer默认隐式动画是禁用的的。
显示动画:自定义来指定动画,主要可以通过:CABasicAnimation、CAKeyFrameAnimation、CAAnimationGroup、CATransition等类来做动画